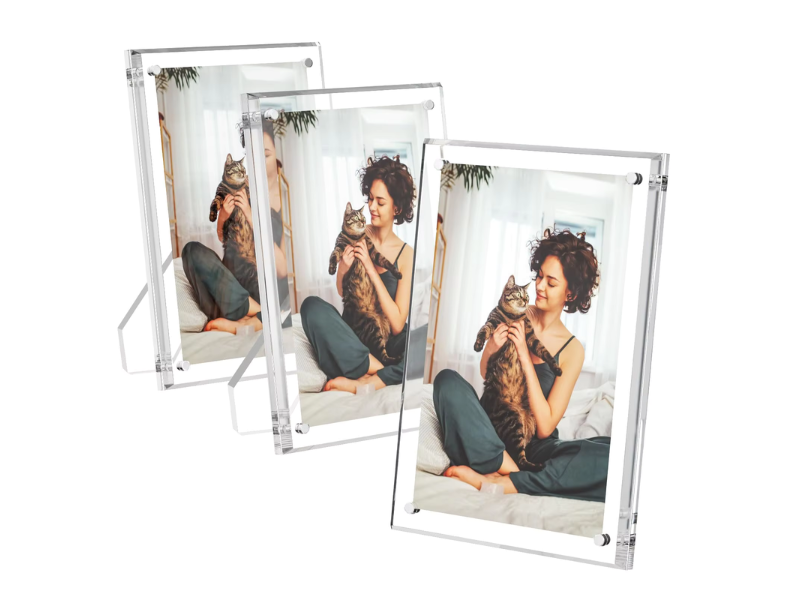
But maybe you are staring at the thing wondering how it actually works. Do you just lean the photo against it? Is there a hidden slot somewhere? Do not worry, you are not alone. The good news is that using an acrylic photo stand is surprisingly simple. You do not need any tools, glue, or special skills. Once you learn a couple of easy tricks, you will get that cool floating look that makes these stands so popular. Let me walk you through it from start to finish, so you can get your photo up and looking great as fast as possible.
Before you even touch the stand, take a good look at your picture. What kind of paper is it printed on? Is it thin copy paper or thicker cardstock? For the best result, you want a print that is nice and flat. Wrinkly or curled paper does not look good behind the clear surface. A matte photo paper works really well because it cuts down on glare and resists curling. Also, double check that the photo size matches the stand. If you have a five by seven stand, you need a five by seven photo. Trim off any white borders if you want that full bleed look, or leave a tiny bit of margin for a more classic style. And do not forget to dust off the photo. Every little speck will show through that clear acrylic, so a quick clean beforehand saves you a lot of frustration later.
Alright, here is the fun part. Most acrylic photo stands use a simple two piece design. You have a front piece and a back piece. The back piece might have little grooves, or it might be completely flat. Either way, you can gently separate the two acrylic parts. But be careful. Do not force them apart or bend them too much, because acrylic can snap if you get too rough. Once you have them separated, lay your photo face up on the back piece. Center it so there is equal space on all sides. Then place the front piece back on top, sandwiching the photo in between. The static electricity from the acrylic will help keep everything in place. After that, just slide the whole thing into the base of the stand. If your stand has an easel back, flip it open and adjust it to your preferred angle. Congratulations, you have just used an acrylic photo stand like a pro.
Once you get the hang of the basic setup, you can start having some real fun. These stands are usually meant for one photo, but you can layer two prints back to back to create a double sided display. That is perfect for a reception desk or a shelf where people walk past from both sides. Another neat trick is to slip in a piece of decorative paper, a dried flower, or even a small leaf along with your photo. It adds a really nice artistic touch. For weddings, birthday parties, or other events, you can group several stands together on a table with different pictures from the same occasion. It tells a little story that people love to look at. Plus, because there is no sticky glue or permanent attachment, you can swap out photos whenever you want. It takes about thirty seconds. That means one acrylic photo stand can show off your vacation pictures this week and your kid's school photo the next.
Where you put the stand matters more than you might think. An acrylic photo stand looks amazing on a desk, a bookshelf, a nightstand, or a reception counter. The clear material catches the light in a really pleasing way. But be careful about direct sunlight. Too much sun over time can fade your photo and might even cause the acrylic itself to yellow a little bit. So a spot near a window with a sheer curtain is fine, but right on the windowsill is probably not a good idea. Also, think about what is behind the stand. Because acrylic is see through, whatever is behind it becomes part of the display. A plain wall or a simple shelf background lets your photo really pop. A busy patterned wallpaper might compete with it. Try moving the stand around to a few different spots before you decide. You might be surprised how different the same photo looks under different lighting.
Here is the one rule you absolutely have to remember. Never ever use glass cleaner on an acrylic photo stand. Glass cleaner has ammonia and other harsh chemicals that will make the acrylic cloudy and permanently ruin it. That is a mistake you do not want to make. The right way to clean it is super simple. Grab a soft microfiber cloth, some lukewarm water, and a tiny drop of mild dish soap. Dip the cloth in the soapy water, wring it out really well so it is just damp and not dripping, and gently wipe the surface. Then use a separate dry microfiber cloth to buff it dry. For dust, just use a dry soft cloth or a feather duster. Do not use paper towels, because they are scratchy and will leave tiny scratches all over the clear surface. Follow this simple routine, and your acrylic photo stand will stay crystal clear for years. And if you need to remove fingerprints, that damp cloth trick works every time.
Using an acrylic photo stand is really easy once you know the basics. Get a nice flat photo, gently separate the two acrylic pieces, sandwich the picture in the middle, and put it into the base. Then find a good spot away from harsh sunlight and enjoy how modern and clean it looks. Cleaning is just a soft cloth and a little soapy water, no harsh chemicals allowed. Whether you are showing off family pictures at home or displaying a menu or price list in a small shop, an acrylic photo stand is a simple tool that makes whatever you put in it look ten times better. So go ahead, grab that favorite photo and give it the display it deserves.
 Hot News
Copyright © 2025 by Wenzhou XYBP Cultural Supplies Co., Ltd. - Privacy policy